Awards & Recognition DIY, DIY Arts & Crafts Projects, Royal Brites® Projects, School Projects
How to Make a Foam Board Dollhouse
How to Make a Foam Board Dollhouse: A Fun and Creative DIY Project
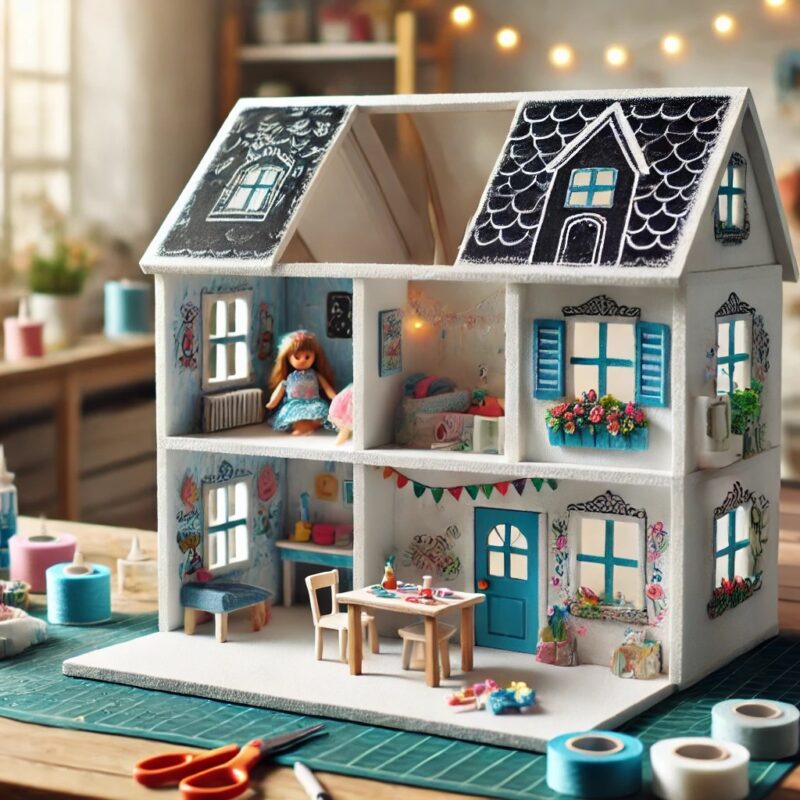
Building a dollhouse out of foam board is such a fun way to get creative, and the best part is that you can make it as simple or detailed as you like. Whether you’re crafting it for your kids, for decoration, or just for yourself (hey, no judgment—dollhouses are awesome), this project is a great way to let your imagination run wild. Plus, using materials like Royal Brites poster boards lets you add tons of personality and charm.
Here’s a step-by-step guide to creating your own foam board dollhouse; moreover, it includes helpful tips for decorating it by combining foam board with a variety of cool poster board designs, ensuring a unique and personalized touch.

Foam Board Dollhouse: Materials You Need to Gather Before Starting:
- Foam board: This will serve as the base material for your dollhouse structure; moreover, it provides the foundation for building a sturdy and creative design.
- Royal Brites Poster Boards:
- Black Poster Board for roofing or sleek accents.
- Cloud Design Poster Board for cute sky-themed walls or backdrops.
- Glitter Glam Poster Boards (blue, gold, red, or silver) to add sparkle and glam.
- Comic Burst Shapes for playful interior wall decor.
- Glue: Craft glue or a hot glue gun (just be careful—it gets hot!).
- Scissors or a craft knife: For cutting out shapes and pieces.
- Ruler and pencil: To make sure your lines are straight.
- Extras: Paint, stickers (like Royal Brites Party Stickers), and mini furniture for decorating.
Step 1: Plan Your Dollhouse
First, picture how you want your dollhouse to look. How many rooms will it have? Do you want two floors, three floors, or maybe a loft? Will it have a sloped roof, flat roof, or open walls for easy access? Grab a piece of paper and sketch out your idea—it doesn’t have to be fancy, just enough to guide you as you build.
If you want to add something whimsical, consider using the Cloud Design Poster Board for your walls. Imagine each room with a sky-themed backdrop—it’s such a sweet touch.
Step 2: Cut Out Your Pieces
- Base: Cut a large rectangle from foam board to serve as the foundation of your dollhouse. This is where everything will sit, so make it sturdy.
- Walls: Cut foam board panels for the outer walls and inner room dividers. If you want windows or doorways, cut those out now.
- Floors: Measure and cut foam board pieces for each level of your dollhouse.
- Roof: For a sloped roof, cut two triangular pieces for the sides and two rectangular pieces for the roof panels. If you want a sleek, modern look, the Black Poster Board makes a great roofing material.
Step 3: Build the Structure
1.Attach the Walls:
Start by gluing the walls to the base. Use your ruler to line them up straight, but don’t stress if they’re not perfect—imperfections add character!
2.Add the Floors:
Glue the floor pieces between the walls to create separate rooms; additionally, applying a little extra glue along the edges will, moreover, help keep them stable and secure.
3.Add the Roof:
If you’re using foam board, glue the triangular pieces on each side and attach the roof panels on top. For an easier option, you can simply glue Black Poster Board or Glitter Glam Poster Board on top to create a lightweight roof.
Step 4: Decorate Your Foam Board Dollhouse
This is the moment where your dollhouse truly comes to life; moreover, it’s your chance to have fun and, additionally, unleash your creativity!
- Wallpaper: Use Glitter Glam Poster Boards or Cloud Design Poster Board for the walls. You can even mix and match for different rooms—glitter for a glamorous bedroom, clouds for a dreamy nursery, or bold colors for the kitchen.
- Flooring: Add texture to the floors by gluing printed poster board or painting them with wood or tile patterns.
- Roofing Details: Cut the Black Poster Board into scalloped shapes to create shingles, or leave it smooth for a modern finish.
- Windows and Doors: Frame your windows with pieces of foam board or decorate them with stickers. You can even glue on tiny curtains made from fabric scraps for an extra homey touch.
- Furniture: Add miniature furniture or make your own with foam board scraps. A little table, chairs, or a bed can really bring your dollhouse to life.
This is the stage where your Foam Board Dollhouse comes to life. Moreover, add glittery wallpaper for sparkle, textured flooring for realism, and stylish roofing for character. Additionally, frame windows with foam board or tiny curtains for a cozy touch. Finally, incorporate miniature furniture, either store-bought or handmade, to complete the look beautifully.
Step 5: Add the Finishing Touches
The little details, after all, are what truly make your dollhouse special; furthermore, they add personality and charm that bring the entire creation to life. Here are a few ideas:
- Use Royal Brites Party Stickers to decorate the walls or furniture.
- Paint flower boxes under the windows or add stickers for a colorful garden look.
- If you used the Cloud Design Poster Board, cut out small clouds and paste them inside or on the roof for a whimsical feel.
A Few Tips From My Experience
- Be patient! Gluing foam board takes a little time, but the results are worth it.
- Don’t stress about imperfections; after all, DIY projects are all about having fun. Furthermore, they’re an opportunity to create something truly unique and personal.
- Use poster boards creatively—They’re lightweight and, moreover, available in a variety of fun designs; additionally, this makes them perfect for adding personality and charm to your Foam Board Dollhouse.
Customize Foam Board like a Pro with Iclicknprint Free Poster Board Layering Tools.

 .
.